
[ This article is available in French / Cet article est disponible en Francais ]
Here’s a short tutorial on how to update the status of GPIO connectors from a Raspberrypi to an MQTT server, using docker images.
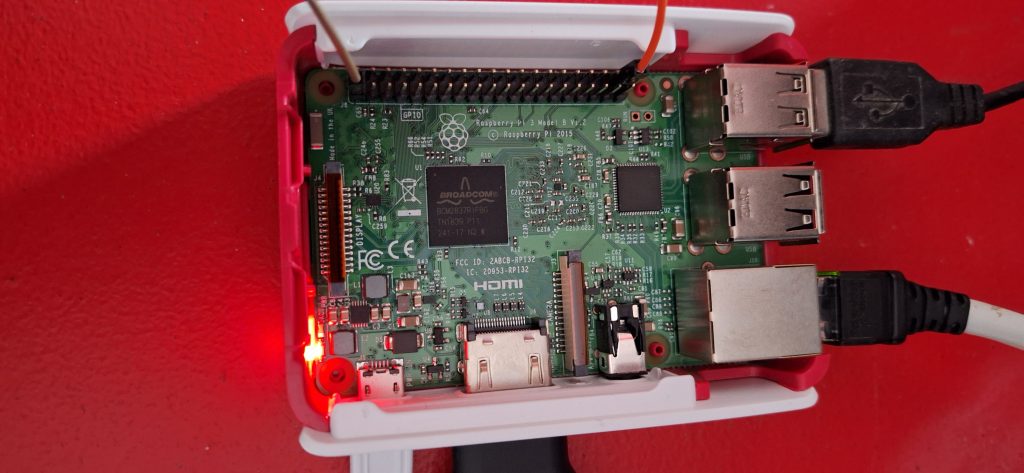
You’ll be able to read the GPIO status, but also modify it if, like me, you have a relay connected to it.
The first thing to know is that, depending on the OS version installed on your Raspberry Pi, this will be more or less complicated.
Debian 11 and 12: These versions have the CONFIG_STRICT_DEVMEM option activated at compile time, making it complicated and sometimes even impossible to read the “/dev/mem” device from a container. You have to recompile the kernel! Personally, recompiling to be able to read GPIOs and send them to an MQTT server is far too time-consuming, so I don’t use these versions for GPIO2MQTT.
Debian 10: No problem reading the “/dev/mem” device, so I’ll use this version.
Contents:
- 1. OS installation: Debian 10.
- 2. Installing Docker on the RPI.
- 3. A few basics about Docker and Docker-Compose.
- 4. Several solutions for GPIO2MQTT.
- 5. With Home Assistant.
- 5.1. Creating the Home Assistant container.
- 5.2. Connecting to the Home Assistant interface.
- 5.3. Adding and enabling GPIO support in Home Assistant with HACS.
- 5.4. Configuration example: PIN 38 and 40 monitoring.
- 5.5. Configuration example: PIN 40 becomes a Switch/Relay.
- 5.6. Supplement : List of usable PINs.
- 6. Home Assistant : Send GPIO status to an MQTT server.
- 6.1. Activating Home Assistant’s “advanced mode.
- 6.2. Add and configure MQTT integration in Home Assistant.
- 6.3. Adding Home Assistant items for export to MQTT.
- 6.4. Modify a GPIO switch if an MQTT topic changes.
- 7. With “flyte/mqtt-gpio” : [ TO DO ]
1. OS installation: Debian 10
- Download the RPI3 image at this address : https://downloads.raspberrypi.org/raspbian_lite/images/raspbian_lite-2020-02-14/2020-02-13-raspbian-buster-lite.zip
- Keep only the file 2020-02-13-raspbian-buster-lite.zip, do not unzip it.
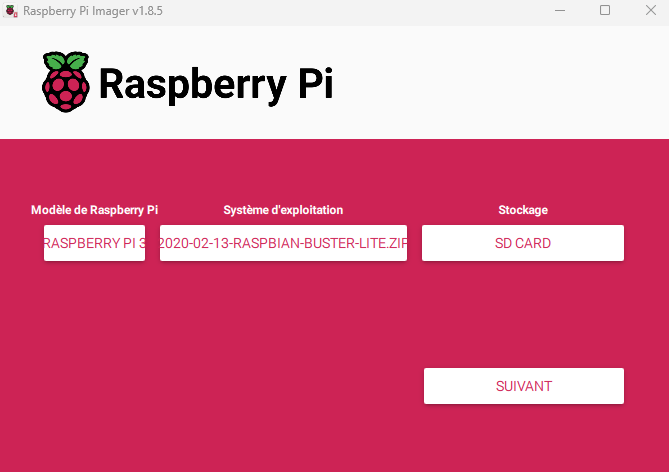
- Download and install “Raspberry Pi Imager” from the official website https://www.raspberrypi.com/software/
- Launch the application.
- Choose the model, in my case a “Raspberry pi 3”.
- Select OS: go to “Use Custom“, select file “2020-02-13-raspbian-buster-lite.zip”
- I advise you to click on “Modify settings”.
- Check “Set user name“: enter name and password to connect to RPI.
- Check “Local settings“: set time zone and keyboard.
- In services, check “enable ssh“.
- When all settings are complete, click on “Save”.
- After a few confirmations, the writing begins.
- When the operation is complete, you can remove the card and place it in the rpi3.
- On the RPI, after several seconds and 1 or 2 RPI restarts, you should see a prompt on the screen.
2. Installing Docker on the RPI

We’re going to install docker on the RPI, so that we can use one or more images to read the GPIOs and send their status to an MQTT server. If you’re not familiar with Docker, don’t worry, we’re going to carry out some very simple operations that don’t require a great deal of Docker knowledge.
- You need to connect to your RPI: either by being directly connected to it, or by connecting via SSH. In both cases, you can use the user and password you defined in the step above, then elevate your privileges with the “sudo -s” command.
I advise you to use SSH, which will enable you to copy/paste command lines. - Download docker for Debian 10
wget https://download.docker.com/linux/debian/dists/buster/pool/stable/armhf/containerd.io_1.6.33-1_armhf.deb
wget https://download.docker.com/linux/debian/dists/buster/pool/stable/armhf/docker-ce-cli_26.1.4-1~debian.10~buster_armhf.deb
wget https://download.docker.com/linux/debian/dists/buster/pool/stable/armhf/docker-ce-rootless-extras_26.1.4-1~debian.10~buster_armhf.deb
wget https://download.docker.com/linux/debian/dists/buster/pool/stable/armhf/docker-ce_26.1.4-1~debian.10~buster_armhf.deb
wget https://download.docker.com/linux/debian/dists/buster/pool/stable/armhf/docker-compose-plugin_2.27.1-1~debian.10~buster_armhf.deb
- Installing downloaded files :
dpkg -i containerd.io_1.6.33-1_armhf.deb
dpkg -i docker-ce-cli_26.1.4-1~debian.10~buster_armhf.deb
dpkg -i docker-ce_26.1.4-1~debian.10~buster_armhf.deb
dpkg -i docker-compose-plugin_2.27.1-1~debian.10~buster_armhf.deb
- For the last file, there is a dependency which is not always installed by default. It must therefore be installed before :
apt update
apt install dbus-user-session
dpkg -i docker-ce-rootless-extras_26.1.4-1~debian.10~buster_armhf.deb
And that’s it! Docker is installed.
3. A few basics about Docker and Docker-Compose

Without giving a course on Docker, here are some basic concepts :
- A container runs one (or more) images, which is much lighter than virtualizing a complete OS..
- An image has its own environment (directory, running process, etc.), which makes the containers watertight..
- The images can be built by us using a configuration file (DockerFile) or can be downloaded automatically from the Docker website.
- The images specified in the configuration file (docker-compose.yml) are automatically retrieved from the official DockerHub site when the container is created.
- A container can run several images, in which case all the processes in each image can communicate with each other.
- A container can perform port and directory redirection. For example, you can specify that the folder in the container “/home/mycontainer/” be redirected to the host folder (the RPI in our case) “/home/rpi”.
- Containers can be managed, created and deleted using the “compose” option of the “docker” command, e.g. “docker compose ps”. This is a new option; before, you had to use the “docker-compose” command. To use “docker compose …”, you need to be in the “docker-compose.yml” directory.
- The creation of a container can be done by creating a “docker-compose.yml” configuration file in each directory corresponding to our container. This is what we’re going to use here.
- The basic commands are :
docker ps: view executed containers.docker stop homeassistant: stops the container named “homeassistant”docker compose ps: view containers running in the current directory (docker-compose.yml file).docker compose up -d: creates and executes the container, downloads the necessary images, detaches the container from the session (i.e. it continues to run even after disconnection). You need to be in the “docker-compose.yml” directory.docker compose logs: displays container logs
4. Several solutions for GPIO2MQTT
Now that Docker is installed, all that’s left to do is choose a container that will do the job.
One of the simplest methods is to use the “Home Assistant” image, but there are other images like “flyte/mqtt-gpio” …
The great thing about Home Assistant is that there’s a wealth of documentation and tutorials on the subject. It’s also very easy to perform actions based on GPIO behavior. For example, changing the state of one or more GPIOs can result in the change of another to activate a relay, while updating an MQTT server.
I’ll leave you to search the DockerHub for other GPIO2MQTT images to make all your dreams come true!
5. With Home Assistant
We’ll start by creating several directories on our RPI, to store the configuration of our docker images. The first directory, which will contain all the images, will be “docker”, and we’ll create it on the root.
mkdir /docker
Next, we’ll create a directory for Home Assistant :
mkdir /docker/homeassistant
In the “/docker/homeassistant” directory, there will be :
- a “docker-compose.yml” file: this is the configuration file for the “homeassistant” docker image.
- a “config” directory: this directory will be created automatically by docker and will contain the “Homeassistant” configuration.
5.1. Creating the Home Assistant container
Now we’re going to create the Docker Compose configuration file. This file is used to specify the container name, the image to be used, the image TimeZone…
We position ourselves in the “/docker/homeassistant” directory, which will enable us to run the “docker compose ….” commands later.
cd /docker/homeassistant/
Let’s create the “docker-compose.yml” configuration file for our Home Assistant.
nano /docker/homeassistant/docker-compose.yml
Here’s the file to copy into “docker-compose.yml” to install Home Assistant in a container. You can adapt it to your needs if you like.
version: '3'
 services:
   ha-gpio:
     container_name: ha-gpio
     hostname: ha-gpio
     domainname: legeek.info
     image: "ghcr.io/home-assistant/home-assistant:2024.1"
     volumes:
       - ./config:/config
       - /etc/localtime:/etc/localtime:ro
     restart: always
     privileged: true
     network_mode: host
     environment:
       - TZ=Europe/Paris
     cap_add:
       - SYS_RAWIO
Now we’ll start creating the container:
docker compose up -d
Downloading, decompression, installation and execution begin. This may take a few seconds, depending on the speed of your RPI, SD card, etc.
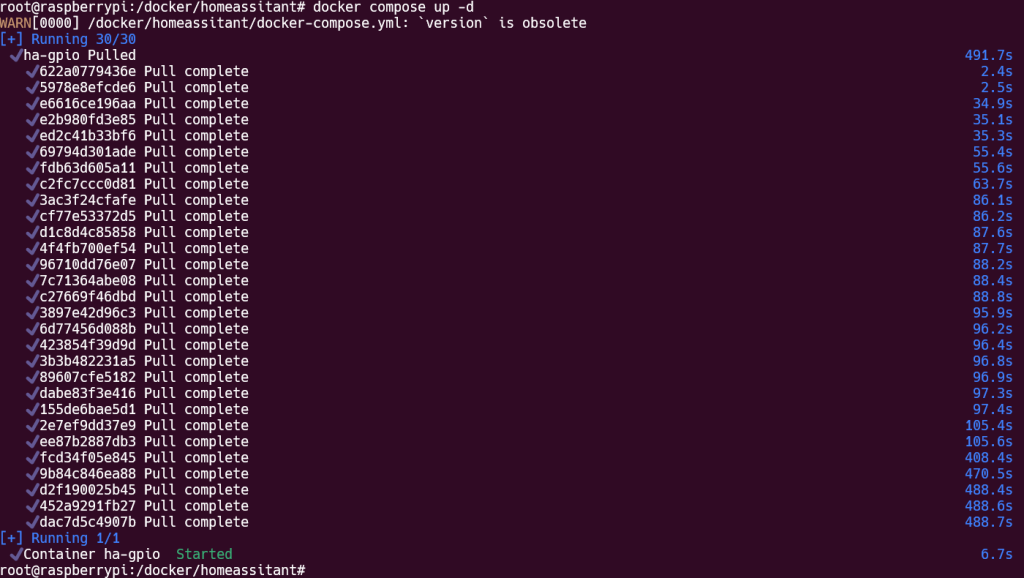
I’ve deliberately locked the Home Assistant version to “2024.1”, as I know that this version works. If you want the latest version, you can replace the line in “docker-compose.yml” like this. Warning: any change to the “docker-compose.yml” file must be followed by the “docker compose up -d” command for the changes to be applied.
image: "ghcr.io/home-assistant/home-assistant:2024.1"
->
image: "ghcr.io/home-assistant/home-assistant:stable"
Once finished, we’ll check that the container has been launched with the “docker compose ps” command:
root@raspberrypi:/docker/homeassistant# docker compose ps
 WARN[0000] /docker/homeassistant/docker-compose.yml: version is obsolete
 NAME      IMAGE                                          COMMAND   SERVICE   CREATED       STATUS       PORTS
 ha-gpio   ghcr.io/home-assistant/home-assistant:2024.1   "/init"   ha-gpio   3 hours ago   Up 3 hours
 root@raspberrypi:/docker/homeassistant#
We can see that the container has been running for about 3 hours.
We will now check the logs with the command “docker compose logs“
root@raspberrypi:/docker/homeassistant# docker compose logs
 WARN[0000] /docker/homeassistant/docker-compose.yml: version is obsolete
 ha-gpio  | s6-rc: info: service s6rc-oneshot-runner: starting
 ha-gpio  | s6-rc: info: service s6rc-oneshot-runner successfully started
 ha-gpio  | s6-rc: info: service fix-attrs: starting
 ha-gpio  | s6-rc: info: service fix-attrs successfully started
 ha-gpio  | s6-rc: info: service legacy-cont-init: starting
 ha-gpio  | s6-rc: info: service legacy-cont-init successfully started
 ha-gpio  | s6-rc: info: service legacy-services: starting
 ha-gpio  | services-up: info: copying legacy longrun home-assistant (no readiness notification)
 ha-gpio  | s6-rc: info: service legacy-services successfully started
 root@raspberrypi:/docker/homeassistant
5.2. Connecting to the Home Assistant interface
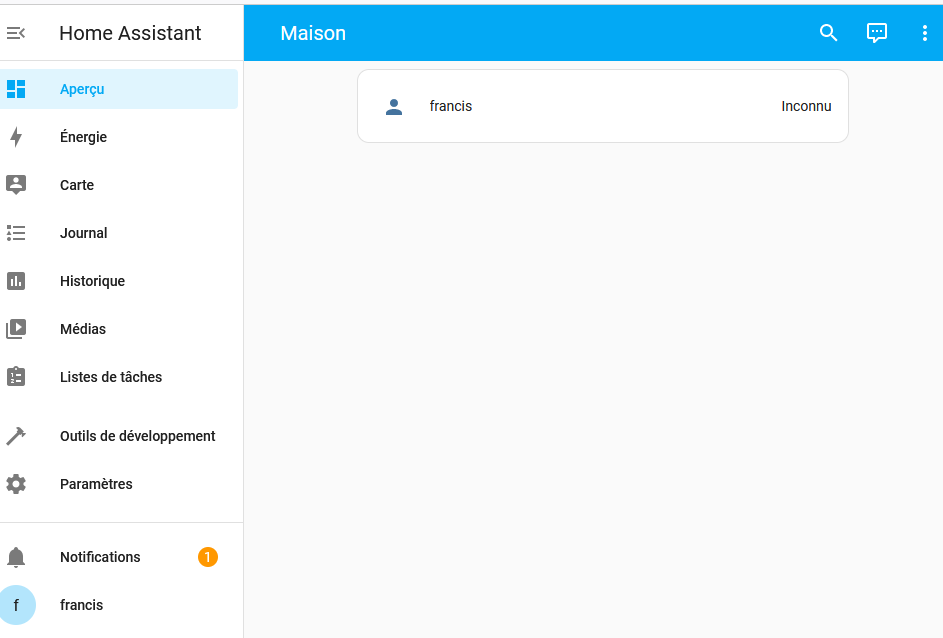
If all goes well, you should be able to log on to the Homeassistant web interface. The address is in the form : http://x.x.x.x:8123
In my case, my RPI got the IP address 192.168.1.248, so I go to the URL http://192.168.1.248:8123 with my favorite browser.


5.3. Adding and enabling GPIO support in Home Assistant with HACS
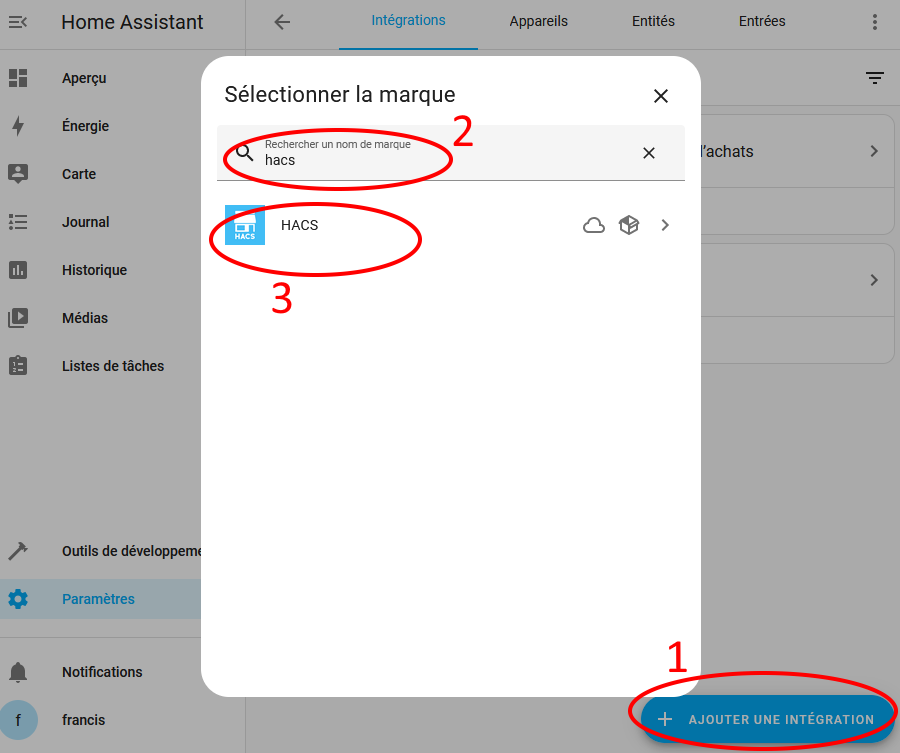
Home Assistant no longer supports GPIOs natively, so you need to add a new “Integration” to your configuration. We’re going to install an extremely popular integration: HACS (don’t worry, nothing complicated).
Connect to your RPI, and run these 2 commands: the first places you in the Home Assistant configuration directory, and the 2nd launches the HACS installation:
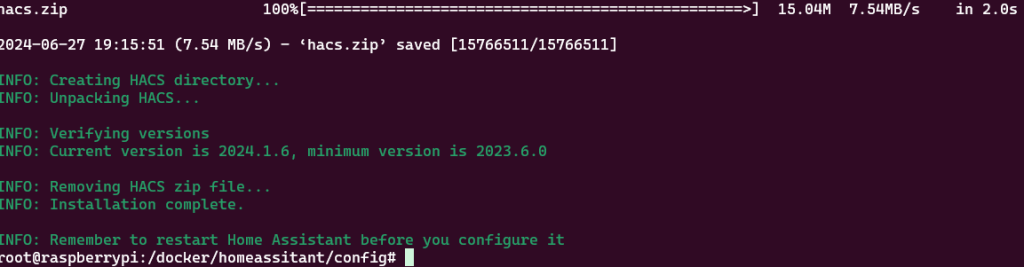
cd /docker/homeassistant/config/
wget -O - https://get.hacs.xyz | bash -
After installation, we’ll restart the Home Assistant container:
cd /docker/homeassistant
docker compose restart

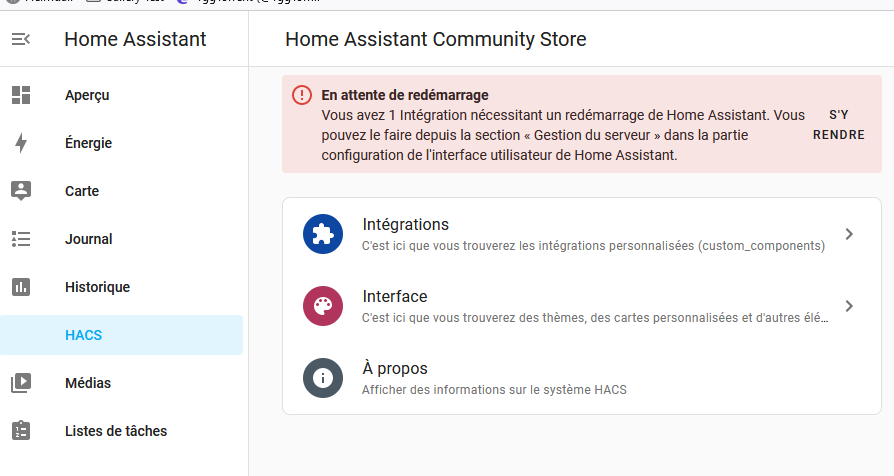
HACS is installed, but not activated, so let’s go back to the Home Assistant interface.
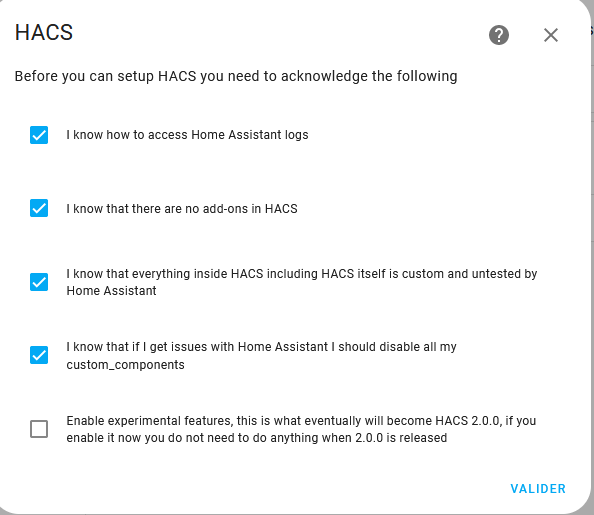
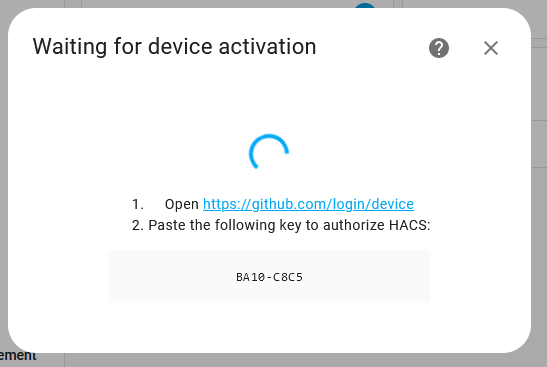
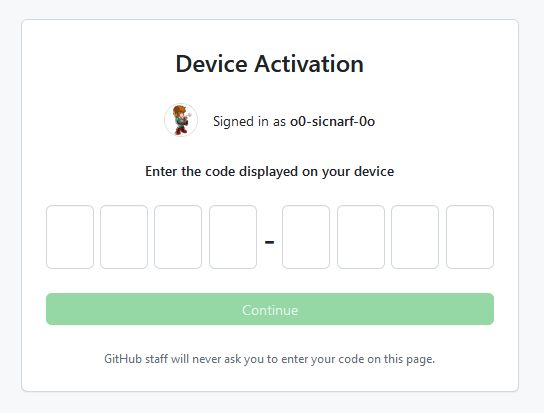
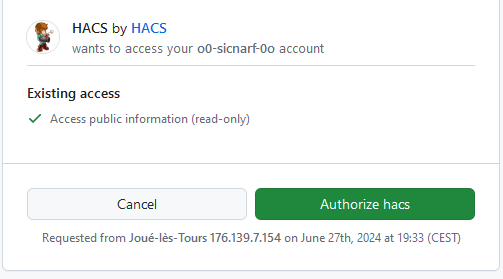
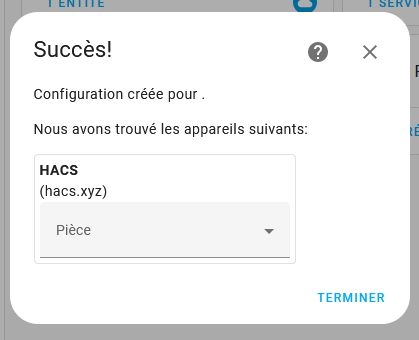
HACS is now installed and activated on your Home Assistant. We can now add GPIO management to our Raspberry Pi :

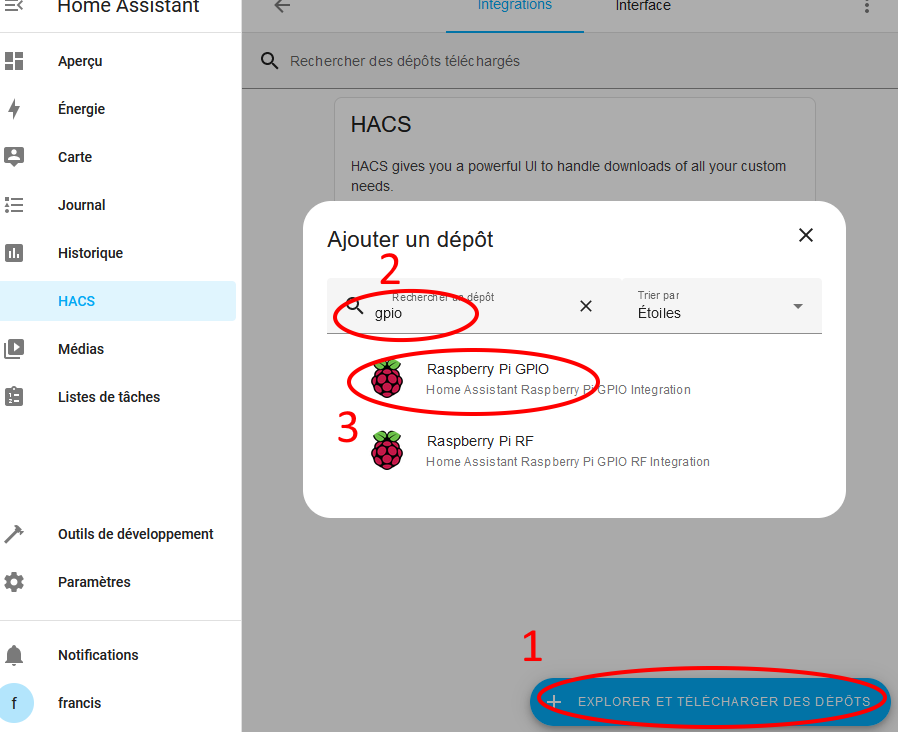
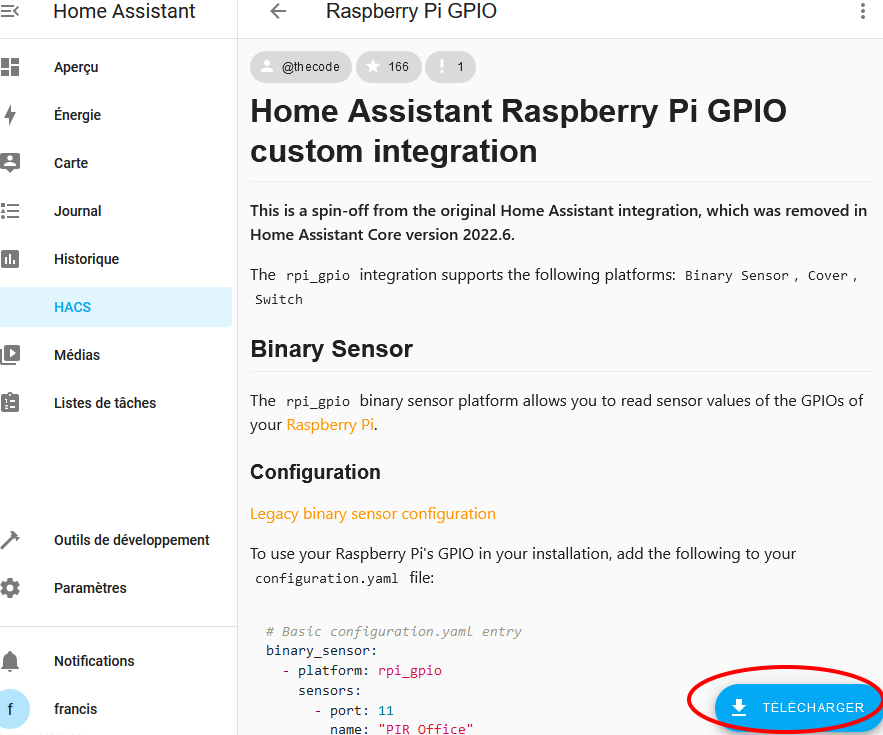
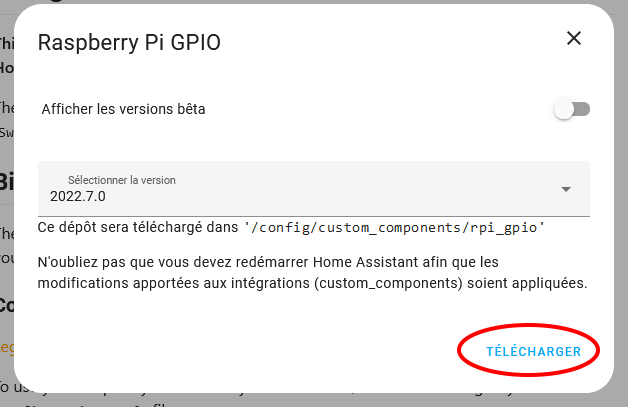
After installation, we’ll restart the Home Assistant container:
cd /docker/homeassistant
docker compose restart

GPIO management via HACS is installed.
5.4. Configuration example: PIN 40 and 38 monitoring
We’re going to monitor the status of PIN40 and PIN38 in Home Assistant.
First, we’ll install the tools needed to view GPIO status and use the “gpio readall” command.
root@raspberrypi:/docker# apt update
root@raspberrypi:/docker# apt install wiringpi
root@raspberrypi:/docker# gpio readall
  +-----+-----+---------+------+---+---Pi 3B--+---+------+---------+-----+-----+
  | BCM | wPi |   Name  | Mode | V | Physical | V | Mode | Name    | wPi | BCM |
  +-----+-----+---------+------+---+----++----+---+------+---------+-----+-----+
  |     |     |    3.3v |      |   |  1 || 2  |   |      | 5v      |     |     |
  |   2 |   8 |   SDA.1 |   IN | 1 |  3 || 4  |   |      | 5v      |     |     |
  |   3 |   9 |   SCL.1 |   IN | 1 |  5 || 6  |   |      | 0v      |     |     |
  |   4 |   7 | GPIO. 7 |   IN | 0 |  7 || 8  | 0 | IN   | TxD     | 15  | 14  |
  |     |     |      0v |      |   |  9 || 10 | 1 | IN   | RxD     | 16  | 15  |
  |  17 |   0 | GPIO. 0 |   IN | 0 | 11 || 12 | 0 | IN   | GPIO. 1 | 1   | 18  |
  |  27 |   2 | GPIO. 2 |   IN | 0 | 13 || 14 |   |      | 0v      |     |     |
  |  22 |   3 | GPIO. 3 |   IN | 0 | 15 || 16 | 0 | IN   | GPIO. 4 | 4   | 23  |
  |     |     |    3.3v |      |   | 17 || 18 | 0 | IN   | GPIO. 5 | 5   | 24  |
  |  10 |  12 |    MOSI |   IN | 0 | 19 || 20 |   |      | 0v      |     |     |
  |   9 |  13 |    MISO |   IN | 0 | 21 || 22 | 0 | IN   | GPIO. 6 | 6   | 25  |
  |  11 |  14 |    SCLK |   IN | 0 | 23 || 24 | 0 | IN   | CE0     | 10  | 8   |
  |     |     |      0v |      |   | 25 || 26 | 0 | IN   | CE1     | 11  | 7   |
  |   0 |  30 |   SDA.0 |   IN | 1 | 27 || 28 | 1 | IN   | SCL.0   | 31  | 1   |
  |   5 |  21 | GPIO.21 |   IN | 0 | 29 || 30 |   |      | 0v      |     |     |
  |   6 |  22 | GPIO.22 |   IN | 0 | 31 || 32 | 0 | IN   | GPIO.26 | 26  | 12  |
  |  13 |  23 | GPIO.23 |   IN | 0 | 33 || 34 |   |      | 0v      |     |     |
  |  19 |  24 | GPIO.24 |   IN | 0 | 35 || 36 | 0 | IN   | GPIO.27 | 27  | 16  |
  |  26 |  25 | GPIO.25 |   IN | 0 | 37 || 38 | 0 | IN   | GPIO.28 | 28  | 20  |
  |     |     |      0v |      |   | 39 || 40 | 0 | IN   | GPIO.29 | 29  | 21  |
  +-----+-----+---------+------+---+----++----+---+------+---------+-----+-----+
  | BCM | wPi |   Name  | Mode | V | Physical | V | Mode | Name    | wPi | BCM |
  +-----+-----+---------+------+---+---Pi 3B--+---+------+---------+-----+-----+
 root@raspberrypi:/docker#
The Home Assistant configuration file is “configuration.yaml”, located in the “config” directory. We’re going to edit it and add lines to monitor PIN40 and PIN38. This file will also be used to send GPIO status to an MQTT server.
Editing the /docker/homeassistant/config/configuration.yaml file
nano /docker/homeassistant/config/configuration.yaml
At the end of the file, you will add these lines :
binary_sensor:
  - platform: rpi_gpio
    pull_mode: DOWN
    bouncetime: 20
    #invert_logic: true
    ports:
      20: NamePin38 #PIN:38
      21: NamePin40 #PIN:40
Please note: PIN38 corresponds to port 20 for Home Assistant, and PIN40 corresponds to port 21. You can find the correspondence between ports and PINs using the ‘gpio readall’ command (you can also see the correspondences above these lines). The ports correspond to the “Physical” (for RPI) and “BCM” (for HomeAssistant) columns.
Restart Home Assistant to take account of the change in the configuration file.
cd /docker/homeassistant
docker compose restart
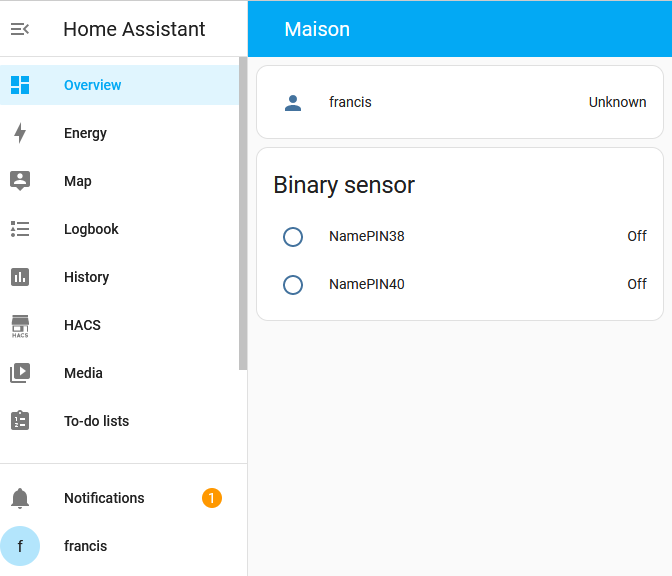
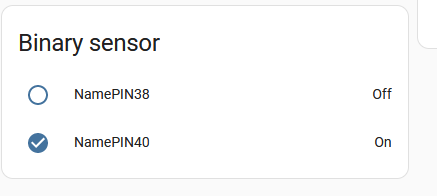
If we go back to the Home Assistant interface, we can see two new binary sensors.
That’s it! To test, we’ll connect the PIN40 to the PIN01 (3.3v)

5.5. Configuration example: PIN 40 becomes a Switch/Relay
If we want to control a relay via a PIN on our GPIO, we have to change the type of element in Home Assistant. For example, this means that PIN40 is no longer a read-only element, but one that we can activate or deactivate, like a switch.
Edit the file /docker/homeassistant/config/configuration.yaml
nano /docker/homeassistant/config/configuration.yaml
Modify the file to look like this:
binary_sensor:
- platform: rpi_gpio
pull_mode: DOWN
bouncetime: 20
#invert_logic: true
ports:
20: NamePin38 #PIN:38
#21: NamePin40 #PIN:40
switch:
- platform: rpi_gpio
invert_logic: true
#assumed_state: false
ports:
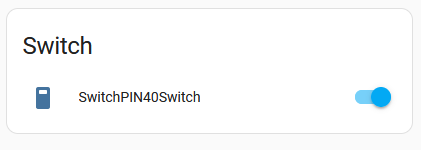
21: SwitchPIN40Switch
Restart Home Assistant to take account of the change in the configuration file.
cd /docker/homeassistant
docker compose restart
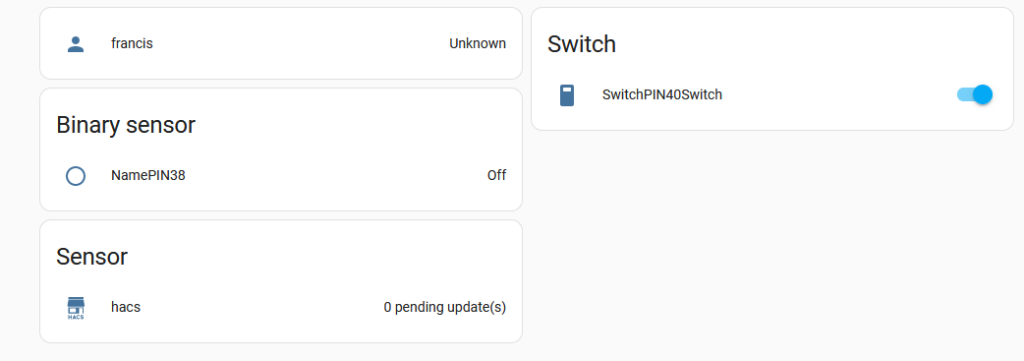
In Home Assistant, the PN40 item has changed:
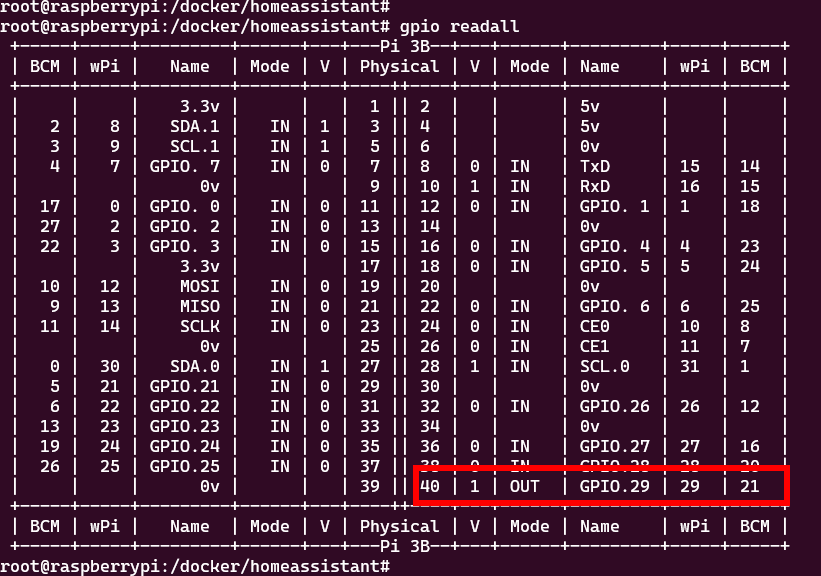
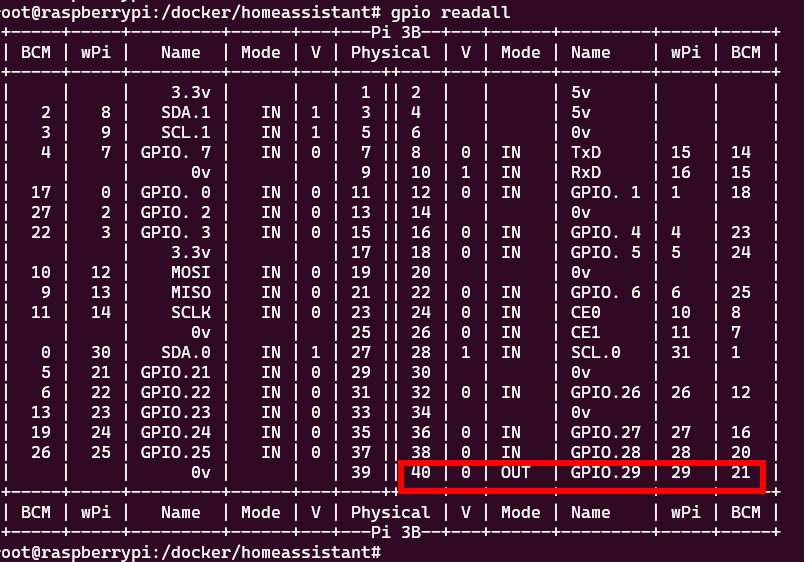
We’re going to look at the GPIO status on the RPI. Type the command “gpio readall”.
We can see from the “V” column that its status is 1.
Now we’ll change its state by clicking on the switch in Home Assistant and watching what the “gpio readall” command displays.
And that’s it!
You can now read or change the state of your GPIOs with Home Assistant.
5.6. Supplement : List of usable PINs
Here’s a list of the ports you can use, just uncomment the lines you’re interested in.
binary_sensor:
  - platform: rpi_gpio
    pull_mode: DOWN
    bouncetime: 20
    #invert_logic: true
    ports:
      #4: NamePIN07 #PIN:07
      #5: NamePIN29 #PIN:29
      #6: NamePIN31 #PIN:31
      #7: NamePIN26 #PIN:26
      #8: NamePIN24 #PIN:24
      #10: NamePIN19 #PIN:19
      #11: NamePIN23 #PIN:23
      #12: NamePIN12 #PIN:12
      #13: NamePIN33 #PIN:33
      #16: NamePIN36 #PIN:36
      #17: NamePIN11 #PIN:11
      #18: NamePIN12 #PIN:12
      #19: NamePIN35 #PIN:35
      #20: NamePIN38 #PIN:38
      #21: NamePIN40 #PIN:40
      #22: NamePIN15 #PIN:15
      #23: NamePIN16 #PIN:16
      #24: NamePIN18 #PIN:18
      #25: NamePIN22 #PIN:22
      #26: NamePIN37 #PIN:37
      #27: NamePIN13 #PIN:13
...
...
6. Home Assistant: Send GPIO status to an MQTT server
For Home Assistant to send GPIO status to an MQTT server, we need to perform several actions:
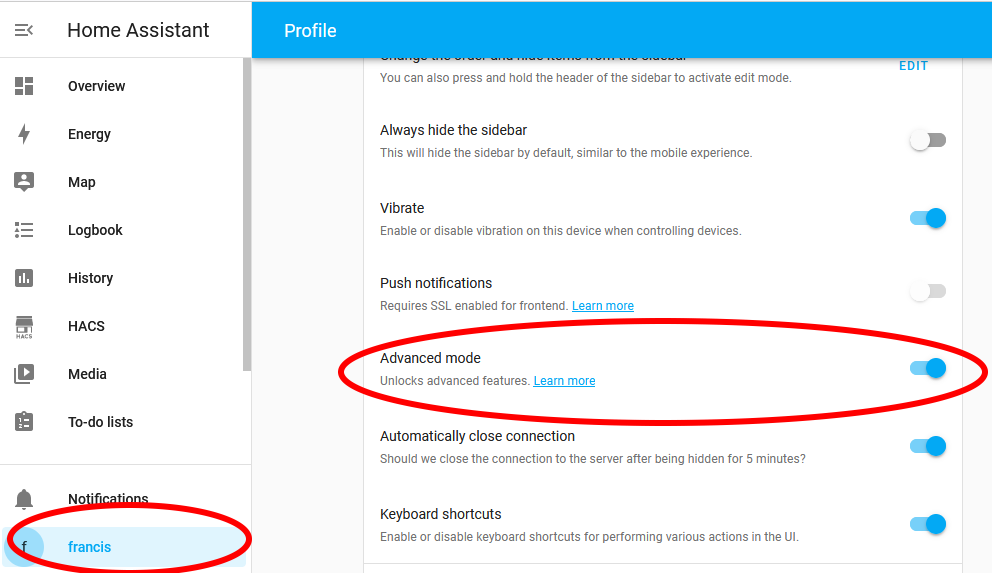
- Enable “advanced mode” for the Home Assistant user, this allows additional options in MQTT.
- If you don’t have an MQTT server, you can follow this tutorial to create an MQTT Broker (Server) container.
- If you don’t have a web interface to view your MQTT Server, you can follow this tutorial to create an MQTT Explorer container.
- Add and configure MQTT integration in Home Assistant.
- Modify the Home Assistant “configuration.yml” file to specify the elements to be exported to the MQTT server.
6.1. Activating Home Assistant’s “advanced mode”
6.2. Add and configure MQTT integration in Home Assistant
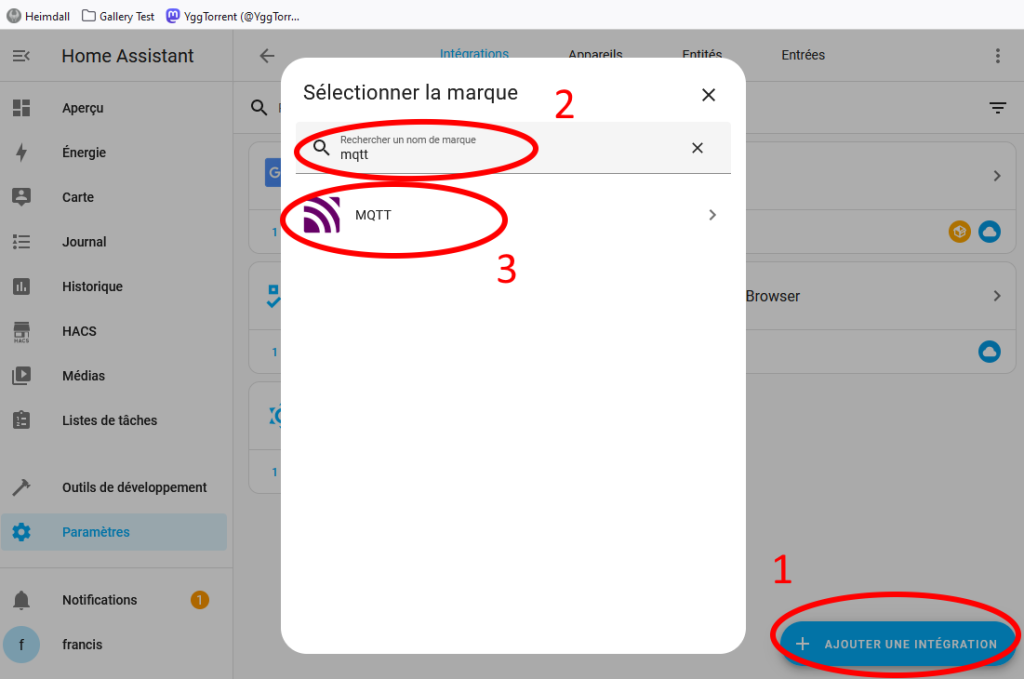
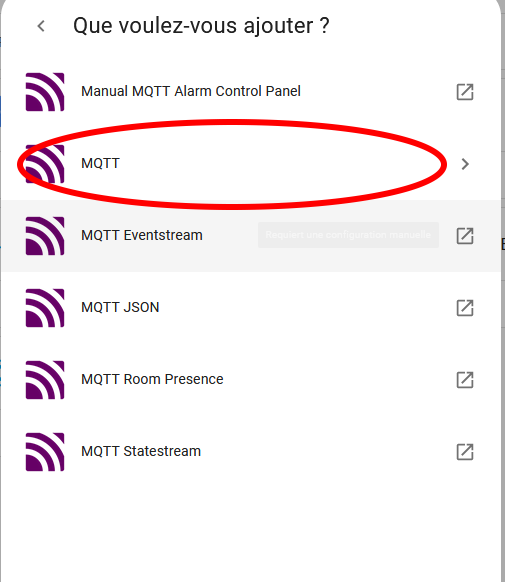
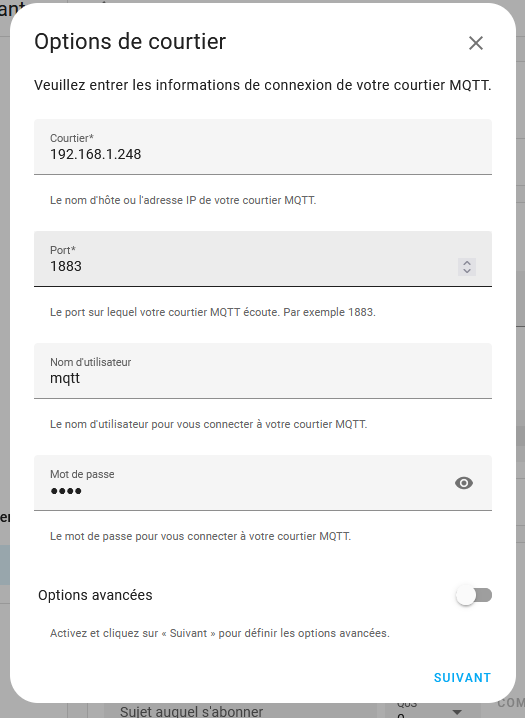
Note that if you haven’t activated the “advanced mode” for the Home Assistant user, there won’t be a “Next” button, but a “Submit” button.
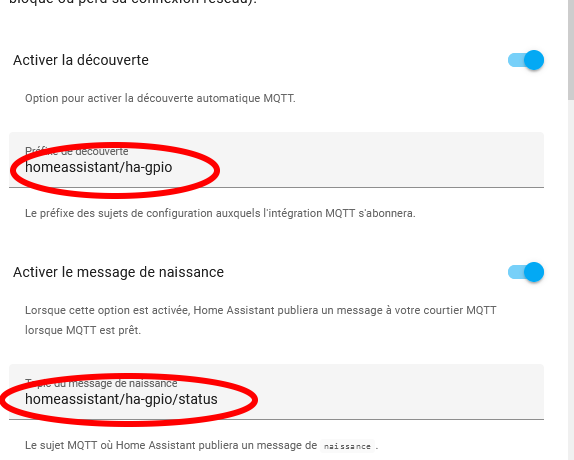
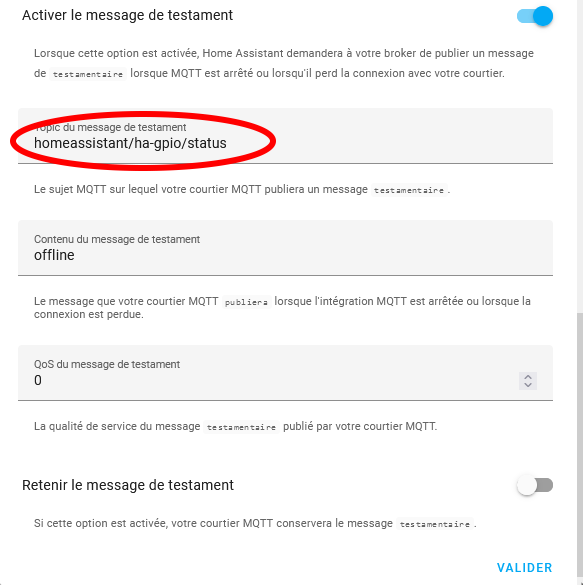
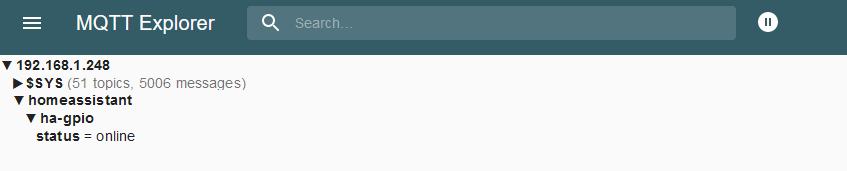
After “Submit”, you should see new topics on the MQTT server.
I advise you to use and install the “smeagolworms4/mqtt-explorer” docker image to modify and view the topics on your MQTT server in real time. You can follow my tutorial on the subject.
6.3. Adding Home Assistant items for export to MQTT
Now we’re going to add the ability to send GPIO states to the MQTT server. To do this, we need to modify Home Assistant’s “configuration.yml” file.
Edit the file /docker/homeassistant/config/configuration.yaml
nano /docker/homeassistant/config/configuration.yaml
Modify the file to look like this:
...
...
mqtt_statestream:
   base_topic: homeassistant/ha-gpio
   publish_attributes: true
   publish_timestamps: true
   exclude:
     entities:
       - sensor.hacs
       - person.francis
       - zone.home
       - sun.sun
       - binary_sensor.updater
   include:
     domains:
       - switch
       - sensor
       - binary_sensor
...
...
Restart Home Assistant to take account of the change in the configuration file.
cd /docker/homeassistant
docker compose restart
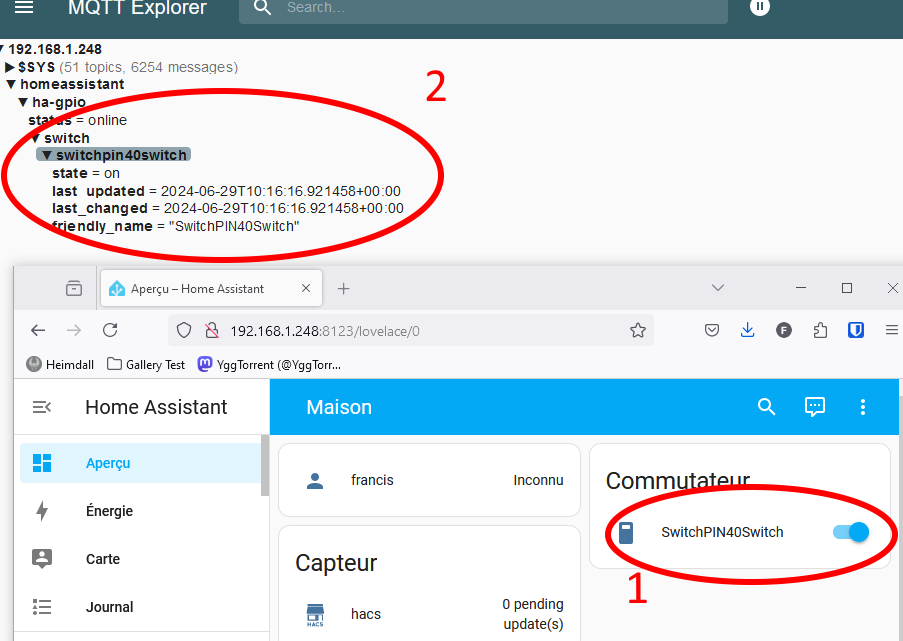
We test this by modifying the state of the switch we created in this tutorial. The MQTT server is immediately updated with a new “topics” indicating its status and the date of modification.
Each element (binary sensors, switches) has its own “topics”, containing a “state” topics with the value “on” or “off”:
6.4. Modify a GPIO switch if an MQTT topic changes.
We’ve seen how changing a switch or a GPIO binary sensor can update the “topics” of an MQTT server.
But for switches, Home Assistant must also modify the GPIO switch when the MQTT server’s “topics” is modified by another service.
We’re going to create 2 “Automations” in Home Assistant:
The first is to say that if the switch’s MQTT “topics” changes to “on”, the switch must be “switched on”. And a 2nd automation: if the “topics” changes to “off”, the switch must be “switched off”.
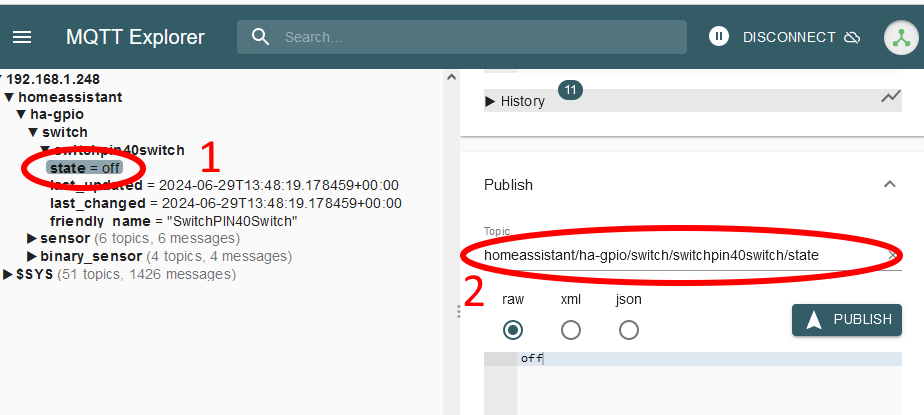
Here’s how the switch’s “topics” should appear on the MQTT server
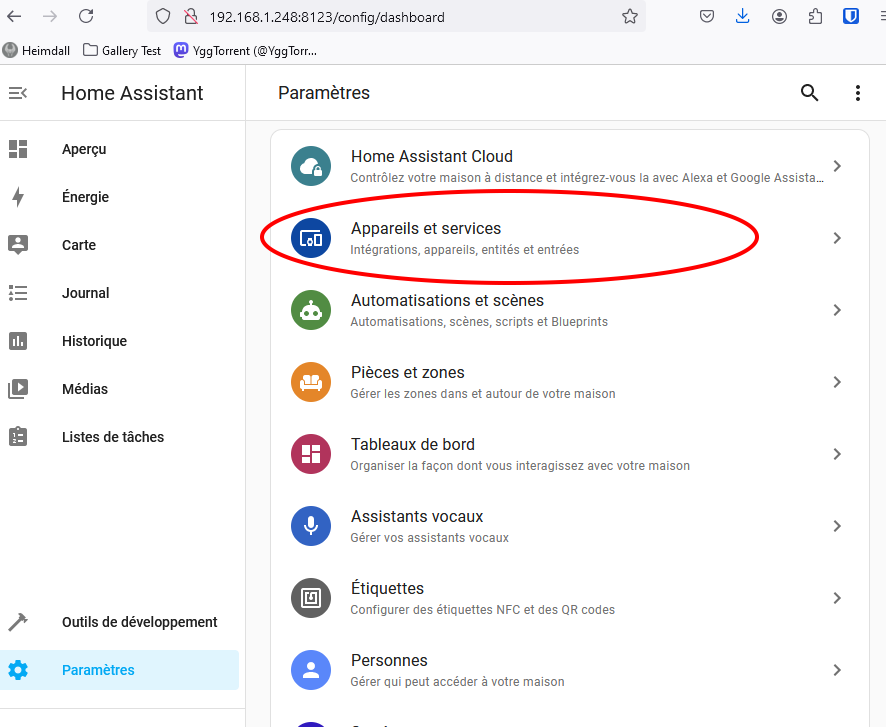
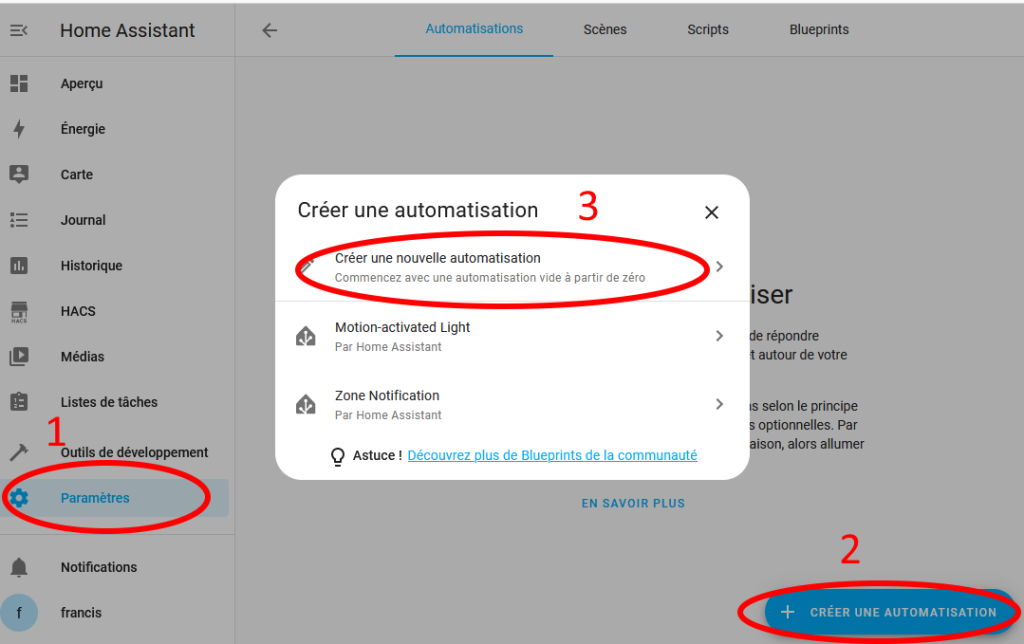
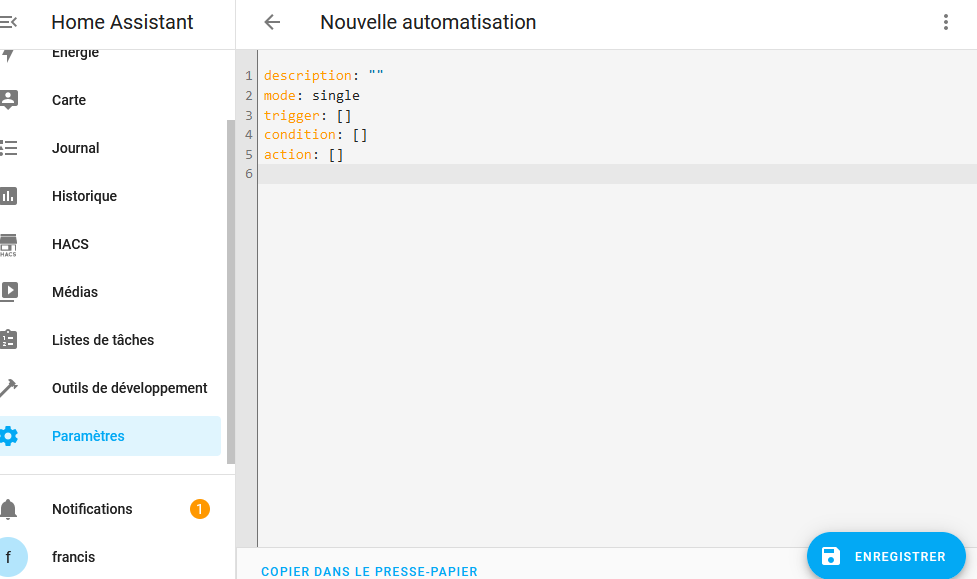
To add an automation to Home Assistant, go to “Settings”, then “Automations and scenes”.
Pictures speak louder than words:

When switching to YAML editing, the default code is displayed. Delete it and set the one displayed after the screenshots.
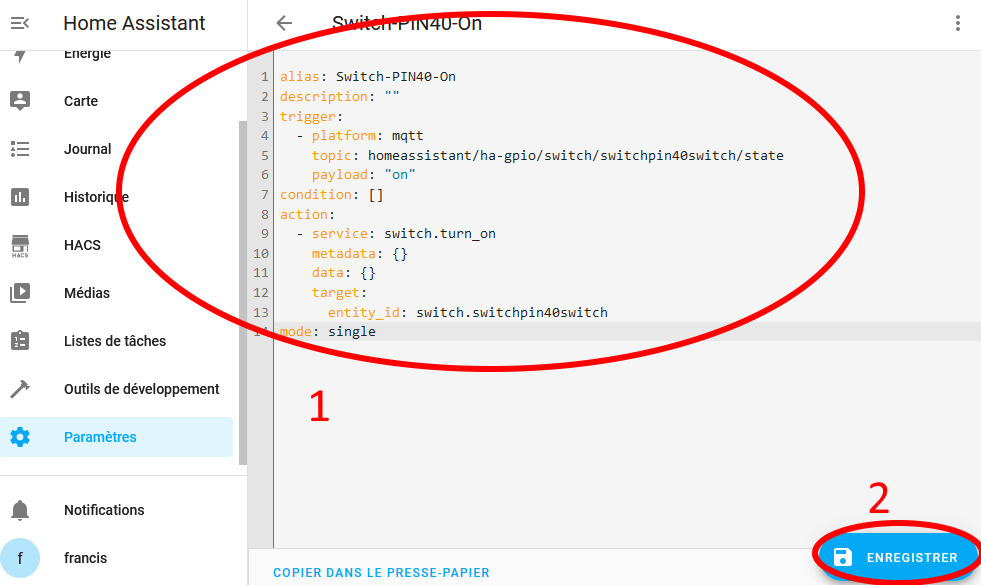
alias: Switch-PIN40-On
description: ""
trigger:
  - platform: mqtt
    topic: homeassistant/ha-gpio/switch/switchpin40switch/state
    payload: "on"
condition: []
action:
  - service: switch.turn_on
    metadata: {}
    data: {}
    target:
      entity_id: switch.switchpin40switch
mode: single
After saving, you’ll be able to see your automation, and even edit it with a visual interface. We’re going to add the 2nd automation, by creating a new automation. Here’s the code :
alias: Switch-PIN40-Off
description: ""
trigger:
  - platform: mqtt
    topic: homeassistant/ha-gpio/switch/switchpin40switch/state
    payload: "off"
condition: []
action:
  - service: switch.turn_off
    target:
      entity_id:
        - switch.switchpin40switch
    data: {}
mode: single
If you change the value from “on” to “off” or vice versa for “topics” with this path “homeassistant/ha-gpio/switch/switchpin40switch/state” , you’ll see that Home Assistant automation is triggered, and changes the GPIO state.

7. Méthode 2 : flyte/mqtt-gpio
… … … ToDo … … …